Implementing Token-Based Authentication Using Django REST Framework (DRF)
Please find the code on my Github repo : Here
Recommended : DRF Serializers Saving Many-to-Many
In this article, we will delve into the implementation of token-based authentication with Django REST Framework (DRF). Token authentication offers a secure approach to exchanging a username and password for a token, which is then utilized in subsequent requests to identify the user on the server side. This method is particularly well-suited for client-server applications, ensuring the token’s safe storage and safeguarding user privacy and security.
Table of Contents
- Prerequisites
- Setting Up The REST API Project (If you already know how to set up a DRF(Django) project, you can skip this)
- Implementing the Token Authentication
- User Login , Register, Logout Process
- Conclusions
Prerequisites
- Basics of Django and DRF
- A System to run the codes
Setting Up The REST API Project
To begin, let’s install Django and DRF by executing the following commands in your terminal:
pip install django
pip install djangorestframework
Next, let’s create a new Django project and app:
Next, let’s create a new Django project and appNow we are good to go. With this let’s go to the next step.
Implementing the Token Based Authentication
The token authentication implementation requires some changes to the project settings, including adding necessary apps and configurations:
Open tokenauth/settings.py and add the following apps to INSTALLED_APPS:
INSTALLED_APPS = [
    'django.contrib.admin',
    'django.contrib.auth',
    'django.contrib.contenttypes',
    'django.contrib.sessions',
    'django.contrib.messages',
    'django.contrib.staticfiles',
    'rest_framework', # Add this
    'user', # Add this
    'rest_framework.authtoken' # Add this
]
Also, add the following variable at the end of tokenauth/settings.py:
REST_FRAMEWORK = {
    'DEFAULT_AUTHENTICATION_CLASSES': [
    'rest_framework.authentication.TokenAuthentication',
    ],
}
Now, let’s update the urlpatterns in tokenauth/urls.py to include the URLs from the user app:
urlpatterns = [
    path('admin/', admin.site.urls),
    path('account/',include('user.urls')), # add this

]
With these changes, any request to /account/* will be directed to the user.urls for further processing.
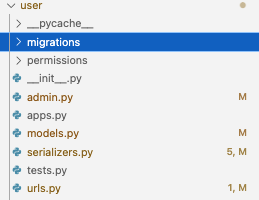
Let’s proceed by creating two files in the user app: urls.py and serializers.py. The folder structure for the user app should look like this:
My user app folder structure.
User Login , Register, Logout Process
Now, we will implement functionalities for user login, register, and logout using APIViews:
In user/urls.py, include the following code:
from django.urls import path
from .views import UserLoginAPIView
from .views import UserRegisterAPIView
from .views import UserLogoutAPIView
urlpatterns = [
    path("login/", UserLoginAPIView.as_view(), name="user_login"),
    path("register/", UserRegisterAPIView().as_view(), name="user_register"),
    path("logout/", UserLogoutAPIView.as_view(), name="user_logout")
]
Next, in user/views.py, update the code for the APIViews:
from rest_framework.exceptions import ValidationError
from rest_framework.authtoken.models import Token
from django.contrib.auth.models import User

# Create your views here.
from rest_framework.views import APIView
from rest_framework.response import Response
from rest_framework import status
from rest_framework.permissions import IsAuthenticated

# serilaizer
from .serializers import UserRegisterSerializer
from .serializers import UserLoginSerializer


class UserLoginAPIView(APIView):
    def post(self, request, *args, **kargs):
        serializer = UserLoginSerializer(data=request.data)
        if serializer.is_valid():
            response = {
                "username": {
                    "detail": "User Doesnot exist!"
                }
            }
            if User.objects.filter(username=request.data['username']).exists():
                user = User.objects.get(username=request.data['username'])
                token, created = Token.objects.get_or_create(user=user)
                response = {
                    'success': True,
                    'username': user.username,
                    'email': user.email,
                    'token': token.key
                }
                return Response(response, status=status.HTTP_200_OK)
            return Response(response, status=status.HTTP_400_BAD_REQUEST)
        return Response(serializer.errors, status=status.HTTP_400_BAD_REQUEST)


class UserRegisterAPIView(APIView):
    def post(self, request, *args, **kargs):
        serializer = UserRegisterSerializer(data=request.data)
        if serializer.is_valid():
            serializer.save()
            response = {
                'success': True,
                'user': serializer.data,
                'token': Token.objects.get(user=User.objects.get(username=serializer.data['username'])).key
            }
            return Response(response, status=status.HTTP_200_OK)
        raise ValidationError(
            serializer.errors, code=status.HTTP_406_NOT_ACCEPTABLE)


class UserLogoutAPIView(APIView):
    permission_classes = [IsAuthenticated]

    def post(self, request, *args):
        token = Token.objects.get(user=request.user)
        token.delete()
        return Response({"success": True, "detail": "Logged out!"}, status=status.HTTP_200_OK)
We have basically 3 APIView here to handle the Logic of login, Register and Logout.
Finally, create the serializers in user/serializers.py:
from rest_framework import serializers
from django.contrib.auth.models import User
from rest_framework.exceptions import ValidationError
from rest_framework import status
from rest_framework.authtoken.models import Token


class UserLoginSerializer(serializers.ModelSerializer):
    id = serializers.PrimaryKeyRelatedField(read_only=True)
    username = serializers.CharField(read_only=True)
    password = serializers.CharField(write_only=True)

    class Meta:
        model = User
        fields = ["id", "username", "password"]


class UserRegisterSerializer(serializers.ModelSerializer):
    id = serializers.PrimaryKeyRelatedField(read_only=True)
    username = serializers.CharField()
    first_name = serializers.CharField()
    last_name = serializers.CharField()
    email = serializers.EmailField()
    password = serializers.CharField(write_only=True)
    password2 = serializers.CharField(write_only=True)

    class Meta:
        model = User
        fields = ["id", "username", "first_name",
                  "last_name", "email", "password", "password2"]
        extra_kwargs = {
            'password': {"write_only": True}
        }

    def validate_username(self, username):
        if User.objects.filter(username=username).exists():
            detail = {
                "detail": "User Already exist!"
            }
            raise ValidationError(detail=detail)
        return username

    def validate(self, instance):
        if instance['password'] != instance['password2']:
            raise ValidationError({"message": "Both password must match"})

        if User.objects.filter(email=instance['email']).exists():
            raise ValidationError({"message": "Email already taken!"})

        return instance

    def create(self, validated_data):
        passowrd = validated_data.pop('password')
        passowrd2 = validated_data.pop('password2')
        user = User.objects.create(**validated_data)
        user.set_password(passowrd)
        user.save()
        Token.objects.create(user=user)
        return user
With these updates, your Django project is now well-equipped to handle user login, registration, and logout with token-based authentication
Logging in and Obtaining Token from the API
I am using thunder client a vscode extension : thunder client
account/register/ is ready to accept post request for register and return token with data.
account/login/ is ready to accept post request for login.And return token if not created it will create it.
account/logout/ is ready to accept post request for logout and will also delete the token, so that when user logging again, will get new fresh token.
Get Sample Request — Response details file : Here
Let’s Register a new user with sample data: http://localhost:8000/account/register/
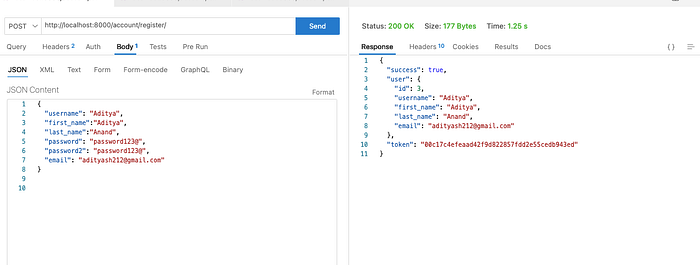
Great! We have successfully created our user using our API.
To initiate the login process and obtain a token from the API, follow these steps:
Open your preferred application and enter the following URL: http://localhost:8000/account/login/
Submit a POST request to the login endpoint with the required credentials. The request should include the following data in the request body:
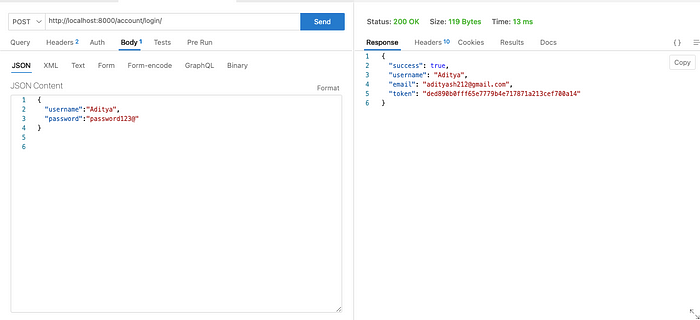
So , we are getting token when we are logging in. Now we can use this token from any frontend app to access any feature of application based on the permissions.
Using the Token for Frontend Application Access
With the acquired token, you can now utilize it in any frontend application to access various features of the application based on the user’s permissions. To do this, include the token in the headers of your API requests in the following format:
Authorization: Token your_acquired_tokenThis way, the backend server will identify the user based on the token and provide access to specific functionalities accordingly.
Now let’s test logout functionality.
Note : Pass Token in Headers in this format like how i am passing in the below screenshot.
- Send a POST request to the logout endpoint http://localhost:8000/account/logout/. Remember to include the token in the headers as shown in the screenshot.
- The API will process the request, and upon successful completion, the token will be deleted, effectively logging the user out.
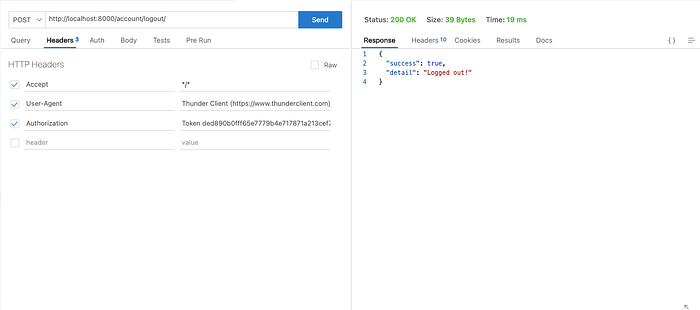
So now our token has been deleted and in this way we are logged out.
By following these steps, you can seamlessly implement token-based authentication in your Django REST Framework application, providing secure and efficient access to various features while maintaining user privacy and security.
Thanks for reading. I hope i have added some value then please applaud (click on this icon 👏) it will really motivate me.
Little about me:
I am Aditya Anand. A full-stack developer who loves to learn new things and share knowledge.
Github : Aditya Anand

![Django Interview Questions [Part 2]](https://miro.medium.com/v2/resize:fit:679/1*lDTTLpzn9I5ukYgH2rCb4A.png)